In today’s digital age, how to take a screenshot on iPhone or capturing moments on your iPhone has become an essential part of communication and documentation. One of the most basic yet crucial features is taking a screenshot. Whether you want to save a memorable conversation, share information, or troubleshoot an issue, knowing how to take a screenshot on your iPhone is invaluable. In this guide, we’ll walk you through the process step by step, ensuring that you become a screenshot pro in no time.

Table of Contents
Introduction
Smartphones have become an integral part of our daily lives, serving as not just communication devices but also as tools for documentation. One of the essential skills every iPhone user should possess is the ability to capture screenshots. Whether it’s preserving memorable conversations, sharing important information, or troubleshooting technical issues, knowing how to take a screenshot can significantly enhance your digital communication experience. In this comprehensive guide, we will unravel the various methods to take screenshots on an iPhone, from the conventional physical button approach to utilizing advanced features like AssistiveTouch and Siri.
Why Take Screenshots?
The act of taking a screenshot extends beyond mere convenience; it is a versatile tool with numerous applications. Screenshots allow you to capture visual information that might not be easily copyable, shareable, or even savable through other means. They serve as snapshots of digital content that can be stored, referenced, or distributed according to your needs. For instance, you can capture images, text messages, social media posts, settings configurations, and more. Screenshots prove to be particularly invaluable when you need to troubleshoot technical glitches, share step-by-step instructions, or maintain a record of vital information.
Methods How to Take a Screenshot on iPhone
Method 1: Physical Buttons

Taking a screenshot using the physical buttons of your iPhone is the most common and straightforward method. Here’s how to do it:
- Navigate to the Content: First, navigate to the content you wish to capture in the screenshot.
- Press the Side and Volume Up Buttons: Simultaneously press the Side button (formerly known as the Sleep/Wake button) located on the right side of the device, and the Volume Up button situated on the left side. The buttons need to be pressed together for a split second.
- Confirmation Animation: As soon as you press the buttons simultaneously, you’ll notice a brief animation on the screen, accompanied by a distinct sound. This animation signifies that the screenshot has been successfully taken.
- Screenshot Preview: The taken screenshot will appear as a thumbnail in the bottom-left corner of your screen. Tapping on the thumbnail will allow you to further edit or share the screenshot.
Method 2: AssistiveTouch (for iPhones without a Home button)

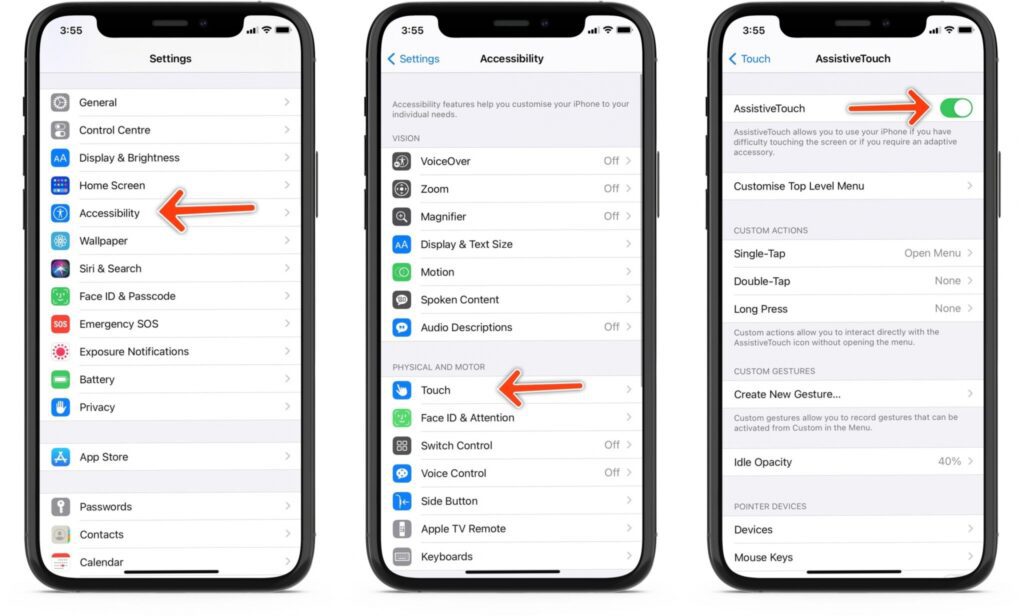
For iPhones without a physical Home button, the AssistiveTouch feature offers an alternative method for taking screenshots:
- Access AssistiveTouch: Go to your iPhone’s Settings, then select Accessibility, followed by Touch, and finally AssistiveTouch.
- Enable AssistiveTouch: Turn on the AssistiveTouch toggle. Once enabled, you can customize the actions associated with AssistiveTouch.
- Set Up Custom Action: Under Custom Actions, choose the Single-Tap option and assign it the task of taking a screenshot.
- Take a Screenshot: With AssistiveTouch activated, a small on-screen button will appear, providing you with easy access to a variety of actions, including taking a screenshot.
Method 3: Using Siri
ou can use Siri to snap a screenshot if you’d rather go hands-free:
- Activate Siri: Activate Siri either by pressing and holding the Side button or by using the voice command “Hey Siri.”
- Voice Command: Give Siri the command “Take a screenshot,” and it will instantly capture whatever is displayed on your screen.
Saving and Editing Your Screenshot
After successfully capturing a screenshot, you can make edits or annotations before sharing or saving it:
- Edit the Screenshot: Tap the screenshot preview that appears immediately after taking the screenshot.
- Cropping: Utilize the cropping tool to define and select the specific portion of the screenshot that you wish to retain.
- Markup Tool: The Markup tool offers the ability to add text, drawings, shapes, and even your signature to the screenshot.
- Sharing Options: Tap the Share button within the screenshot preview to choose how you want to share it. You can share the screenshot via messages, email, social media, or other compatible apps.
Screenshots of Webpages or Messages
Capturing Full-Page Screenshots
When you need to capture an entire webpage or a lengthy message conversation, you can use the full-page screenshot feature:
- Capture a Regular Screenshot: Begin by taking a regular screenshot using any of the methods previously mentioned.
- Access Screenshot Preview: Once you’ve taken the screenshot, a thumbnail preview will appear. Tap on this preview.
- Select “Full Page”: In the top menu of the screenshot preview, select the Full Page option.
- Scrollable Screenshot: Your iPhone will then capture the entire webpage or message conversation as a scrollable screenshot, ensuring you capture every detail
Where to Find Your Screenshots
All the screenshots you take are conveniently stored in the Screenshots album within the Photos app:
- Open the Photos App: Locate and open the Photos app on your iPhone.
- Access Albums: At the bottom of the screen, tap on Albums to reveal various album categories.
- Find Screenshots: Scroll down the list of albums until you find the Screenshots album. Tapping on this album will display all your saved screenshots.
Using Screenshots Effectively
Beyond their basic utility, screenshots can be harnessed effectively to enhance your digital experience:
- Highlight Information: Use tools like arrows, circles, or text annotations to emphasize specific details within the screenshot.
- Troubleshooting Aid: Capture error messages, app malfunctions, or software bugs as screenshots to provide accurate information to tech support.
- Shopping Assistance: Save product details, prices, and reviews as screenshots for later reference when shopping.
- Travel Convenience: Capture digital boarding passes, maps, hotel reservations, and travel itineraries as screenshots for easy access during your journey.
Troubleshooting Screenshot Issues
Ensuring Proper Button Presses
If you encounter difficulties while attempting to take a screenshot, it’s essential to ensure you’re pressing the correct buttons simultaneously. Depending on the model of your iPhone, the required button combination might vary slightly. Make sure you’re pressing the correct buttons and holding them for a brief moment to trigger the screenshot.
Managing Storage Issues
Screenshots, like any other media files, occupy storage space on your device. Given their ease of capture, screenshots can accumulate quickly and consume valuable storage. To mitigate storage issues, periodically review your screenshots and delete any that are no longer needed. This practice not only frees up storage but also helps you maintain an organized digital space.
Conclusion
In the digital landscape, where visual information is abundant and communication is often conducted through images, screenshots play a pivotal role in capturing and sharing content. This guide has equipped you with a comprehensive understanding of how to take screenshots on your iPhone. From the conventional method of using physical buttons to the advanced capabilities of AssistiveTouch and Siri, you now have a range of options at your disposal. Remember that screenshots are not just about capturing moments; they are tools that enhance communication, documentation, and troubleshooting. By mastering the art of taking screenshots, you are better equipped to navigate the digital world with efficiency and confidence.
Frequently Asked Questions
Yes, the ability to take screenshots is a standard feature available on most iPhone models. The methods mentioned in this guide are applicable to various iPhone generations.
To access AssistiveTouch, navigate to your iPhone’s Settings, select Accessibility, then Touch, and finally, AssistiveTouch. From there, you can enable the feature and customize its actions.
No, screenshots cannot be taken while a video is playing. This restriction is in place due to copyright and privacy concerns related to capturing video content.
If you’re unable to locate your screenshots, check the Screenshots album within the Photos app. If they still aren’t visible, ensure that the screenshots are being saved properly by reviewing your device’s settings.
If the physical buttons on your iPhone are malfunctioning or unresponsive, consider using the AssistiveTouch feature as an alternative method for taking screenshots. Additionally, you might want to seek professional repair assistance for your device.
"Enhance Your Screenshot Experience with the iPhone Photography Kit"
“Are you prepared to improve the quality of your iPhone screenshots? Check out the iPhone Photography Kit, a comprehensive set of tools designed to elevate your photography and screenshot-taking skills. This kit includes high-quality lenses, a versatile tripod, and a wireless remote shutter, ensuring that every screenshot you capture is clear, crisp, and professional-looking. Plus, with its user-friendly design, you’ll be able to effortlessly capture stunning shots in any setting. By clicking on the link above, you’ll be directed to Amazon, where you can learn more about this kit and explore how it can enhance your screenshot-taking journey. Please note that if you decide to make a purchase through this link, I may earn a small commission at no additional cost to you. Thank you for your support!”
